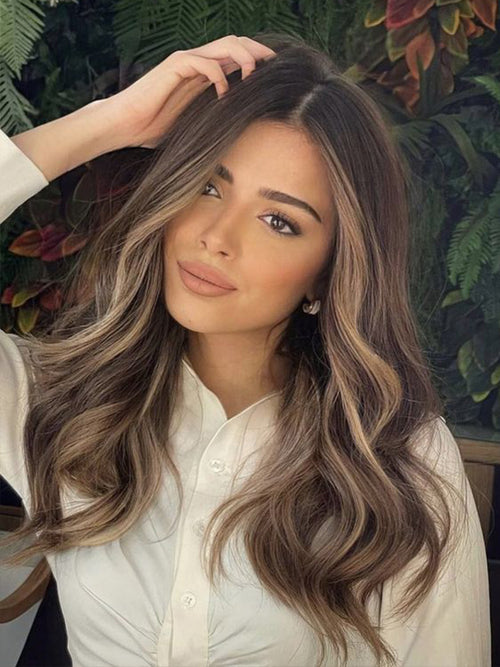
Gorgeous hair is what everyone desires. But what if it starts thinning? Well, Clip-in hair extensions are bliss.
- What are clip in hair extensions
- Difference between PU-weft Clip-In Hair Extensions And Lace-Weft Clip-In Hair Extensions
- Clip-in Hair Extension for Short Hair
- Clip-In Hair Extensions for Thin Hair
- Ways to Curl Your Clip-in Hair Extensions
- Easy hairstyles you can try with clip-in hair extensions
- Tips for Buying Clip-In Hair Extensions
- Tips for Caring Your Clip-in Hair Extensions
- Steps of Clipping in your hair extensions
- Why do many Ladies Choose Clip-in Remy Hair Extensions?
- Popular Hair Extensions Brands On the Market
What are clip in hair extensions
A piece of clip-in hair extension comes with around 7-10 pieces of several width hair wefts. Clips are manually attached on the top of every hair weft. There are two types of clip-in hair extensions in the market; seamless PU-weft clip-in hair extensions and lace-weft clip-in hair extensions.
 Difference between PU-weft Clip-In Hair Extensions And Lace-Weft Clip-In Hair Extensions
The difference between the two is that the lace weft clip in hair extensions are made with sewn-on hair weft. This hair is real and is sewn like a curtain. After this, three pieces of hair wefts of the same width are sewn together on a lace strip with a machine.
For PU clip in hair extension, they are made with glued-on hair weft. These clips are then directly sewn on the weft. The hair weft of one-piece PU seamless clip-in hair extensions is 50% thinner than that of lace weft clip-in hair extensions. This makes the PU seamless clip-in hair extensions lay flat against the scalp.

Therefore, you can skillfully hide the hair weft under your natural hair. This is the primary reason why women with thin fine hair like to wear the PU seamless clip-in hair extensions.
PU Clip-In Hair Extension Is Not Suitable For Coloring The Hair
Lace-weft clip-in hair extensions with thicker hair wefts can make the hair root of the wearer fuller. But if you want to dye your clip-in hair extensions, you should not pick the PU seamless clip-in hair extensions. The PU base is water-proof. Hence, it can’t be dyed.
Silicone Pads Keep the Clip in Hair Extensions Staying In
The clips we used on Mhot clip in hair extensions have silicone pads. As those pads are soft, can provide a better grip to prevent hair extensions from slipping.
The pads can also protect your hair strand from the damage of metal clips for even ladies with fine hair.
 Clip-in Hair Extension for Short Hair
What if you put clip-in hair extensions in your short hair? Is it going to stay in place? What are the requirements that need to be fulfilled? Stay connected with us to know every crumb of detail about it.
Tips for Picking the Right Clip-In Hair Extensions for Your Short Hair
-
Length of Hair
The Hair should be at least 3-4 inches long to put a clip-in hair extension in short hair. The clip-ins need to be applied right under the hairline. You will be able to cover them with your hair so that you can avoid them peeking out.
-
Color of the Extensions
When you are planning to get a clip-in hair extension, make sure to choose the right color. This is crucial for getting perfect blending. In case you cannot get the exact color of your hair, buy a shade lighter and dye it to get the exact shade of your hair.
-
Weight of the Extension
Weight is another important aspect when picking the clip-in hair extension. Even if your hair isn’t very thick, the extension needs to be a bit heavier. Thick hair extension will mask the blunt ends. The transformation of your hair from short to long with the help of extension will be seamless and unnoticeable.
 Tips For Getting A Perfect Blend With Your Short Hair, When You Put Your Clip-In Hair Extensions In
-
Braid And Pin The Hair At The Nape Of Your Neck
Use bobby pins to keep the braid in place. This is the best tip to hide the small hairs that peep out of the extension.
-
Tease Your Hair Roots For Added Grip
If you have finer hair, you need more grip. Teasing the roots will provide this extra grip to your natural hair. Comb your hair strand in a backward direction to get the grip.
-
Add Waves And Curls To Give Them A Little Texture
Curl your extension beforehand so that it matches with your natural hair and blends seamlessly with it.
Clip-In Hair Extensions for Thin Hair
If you have thin and fine hair, what problems do you meet with when you clip your hair extensions in? Well, we've got your concerns covered!
Can’t hide the clips of your hair extensions? At times, it can be difficult to hide the clips of hair extension, especially if you have thin hair. The clip can be seen through the hair and might not fix firmly due to the light texture of your hair.
Clip-in hair extensions may slide off. You may feel the clip-in hair extensions are too heavy in your thin hair. Well, we will help you to get rid of these problems and fix your hair extension seamlessly.
 Choose the Right Extensions
If you have thin hair, heavy hair extensions will do no good to you. Choose a set that is around 120g.
PU seamless clip-in hair is suitable for thin hair extensions specially designed for thin hair. This adds some volume and length to your natural hair without making you feel uncomfortable. You will get a very natural-looking effect.
-
 How to Keep Your Hair Extensions Staying Firmly In Your Hair without Sliding Off?
If you have thin hair, your hair extension might slip throughout the day. The weft should have something to hold on to without sliding. Creating a firm base for clipping the weft is important.
You can make this base by applying hairspray to the root of the hair section to which the weft will be clipped. Tease the hair of that area. This will prevent tugging.
-
What Area Should You Place The Hair Extensions On Your Head, And How To Find This Area?
Finding a safe zone to clip your hair extension is very important. For thin hair, this area is below the line of eyebrows where the clip will not be seen. Draw an imaginary circle around the head from the end of the eyebrow. This is the circle where the wefts will be clipped.
-
How Many Pieces Of Hair Extensions Should You Use?
You do not need to use all the wefts to cover your head. Do not overweight your hair with many wefts. The standard hair extension has 10 wefts. You can use 7-9 wefts to keep the look natural.
-
You May Encounter Getting More Hair At The Bottom Than At The Top Of Your Head, How To Fix It?
When the extensions are clipped in, you may encounter getting more hair at the bottom than at the top of your head. Are you worried about how to fix it? You just need to tease your hair at the crown. This will add some volume to your entire hair. You will have an overall voluminous look.
-
Why Should You Style Your Hair Extensions With A Curl Or Wave?
Your natural hair texture is very different from that of the hair extension. It is important to match the texture of your natural hair. Styling your hair extension with a curl or wave will give it a more natural look. This will give a more smooth transition.
The Ultimate Solution for Thin-Haired Girls
If you worry about clip-in hair extensions that may cause damage to your fine hair, you should choose Halo hair extensions. Halo hair extensions are no damage to your hair.
It is one piece of hair extension that has an invisible wire. It secures the head like a headband. It does not glue the hair in anyway. Therefore, your hair will not have any risk of getting pulled or breaking.
You can enjoy thicker locks today without hindering the growth of your natural hair. It gives a more realistic look when blended with natural hair.
The extension will feel like your real hair. You can also style it according to your convenience. They can be removed easily. You can wash your hair without them which is a boon for fine hair girls. This is why you need to invest in a Halo hair extension.

Ways to Curl Your Clip-in Hair Extensions
You can curl your clip-in hair extensions with two different curl ways that have been mentioned below:
The Curling Method
This method focuses on using several heating tools. These tools are used to curl your hair to perfection. We are spoilt for choices when it comes to choosing the right curling equipment. There are numerous curling tools, and all of them are responsible for creating different types of curls. A few examples of the heating tools include:
Curling Iron
This iron comes with a clamp. You can wrap your hair around the iron and then lock it in with the help of the clamp to curl your hair. This iron is used for forming finer curls.

Curling Wand:
A curling wand is very similar to a curling iron, but it does not have a clamp. Therefore, you can wrap your hair around this wand and then release them to have perfectly curled hair. The curling wand is perfect for creating loose beachy waves.
Hair Straightener:
Hair straighteners are used for creating bigger and thicker curls. While straighteners are usually used for straightening your hair, you can also use this tool for curling your hair as well.
The Heatless Method
As the name suggests, the heatless method allows you to curl your hair without damaging them with heat, and this is the greatest benefit of this method. While heating tools give you perfectly curled hair, the heatless method can also give you some really good curls that will last for a long time without damaging your hair with all the heat. Some of the finest heatless curling tools consist of:
Flexi Rods

Flexi rods are a heatless curling tool. These are long bendable rods, and they are very user-friendly. All you have to do is make your hair extensions a little damp by spraying them with water, and then you will partition your hair and wrap these rods around your hair. Then, allow your hair to dry, and once it's dry, you can unwind the rods and enjoy your curls.
Snail rollers

Snail rollers are another heatless curling tool. These curlers come with a flexible curler and a straight rod with a hook. You need to insert the rod within the curler and then make partitions of your wet hair extensions. You will use the hook of the rod to get the partition inside the curler and then take the rod out. Your hair will be perfectly settled inside the curler, and all you have to do is wait for it to dry. You can remove the snail rollers for nicely curled hair.
Hair rollers

Hair rollers are round curlers. You can roll your hair extensions in these curlers and then let your wet hair dry. Once it's dry, you can remove the curlers, and you'll have curled hair. These rollers come in small and big shapes. You can use the smaller rollers for finer curls and the bigger ones for more loose curls.
Braiding

You don't need any tool for this one. These are your plain old braids. All you need to do is braid your hair in tight or large braids and then let your damp hair extensions dry. You could also let these braids rest overnight, and when you undo your hair, you'll end up with a fine or lose curls.
Pin curling

Pin curling makes use of our trusted bobby pins. What you need to do is make your hair a little damp with water and then roll them up into a curled form. Then you will hold this curl in its place with a bobby pin, and you're done. You can remove these pins once your hair is dry and you will have nicely curled hair.
Preparation
You need to have clean hair, and if you're using a heating tool for curling your hair, then it should be dry, and heating damp hair could be damaging. It would help if you also used a heat protectant as it will help to keep you safe from heat damage. However, if you're going for the heartless method, then you will have to make your hair damp before using any heatless curling tools.
Curing Hairstyle Examples
The following are a few style examples:
Barrel curls
Barrel curls are long curls that are obtained with a curling iron. These curls can be made by wrapping your hair partition around a curling iron in a diagonal form that will give you longer curled hair. You can also create these curls with heatless rollers.
Loose curls
Loose curls can be made with all sorts of heating tools but loosely wrapping your hair around a curling wand or a hair straightener is the best way to obtain these curls.
Beach waves
You can attain beach waves with the help of heatless Flexi rods or by braiding your hair.
Easy hairstyles you can try with clip-in hair extensions
High bun

Whether you are going on a date or meeting your friends for a night out, a high bun never fails to make you look sexy and attractive. With your clip-in hair extensions, you can get the perfect messy high bun that grabs eyeballs.
Comb your hair and apply the first clip-in high up where you want the bun to sit. Attach a few more wefts to get the right volume. Brush the hair extensions and tie your hair in a pony. Now, twist the hair extensions to form a messy bun. Make sure that the clips are well hidden. Secure the bun with bobby pins and you are ready to party.
Braided bun

If you are going to a formal party and want to exude power and elegance, try the braided bun.
Secure your clip-in hair extensions near the ears to increase the volume and length of your natural mane. Use 2-3 wefts for the right volume. Make a neat braid and use a smoothening spray to make your hair look well-done. Wrap the braid in a bun for an elegant look.
Half-up knot

If you are looking for a hairstyle that’s trendy and easy to adopt, try the half-up top knot.
Fasten 2-3 clip-ins high up your head. Tie your hair into a ponytail, leaving a layer of hair below. Secure it with a clear band. Make sure the clips are concealed by the layer of hair. Now make a messy bun and put some bobby pins around it. With this simple but cool hairstyle, you will rock on a date night or grab eyeballs in an evening get-together.
Bubble braid

This is the ultimate in fashion and most women love to sport the favorite hairstyle of Elsa from Frozen. A bubble braid is easy to make by adding volume and length with your clip-in hair extensions.
Use 3-4 long wefts around the middle of your head. After securing them tightly, take half hair from the crown and tie it with a clear band. Pull out a few strands to make your mane look thick. Use a hair strand to wrap the band so that it is not visible and pull it through the ponytail. Now, create the first bubble and tie it at a gap of 3 inches. Go on creating bubbles and teasing them to get the volume. All bubbles must be of equal length and volume.
Natural wavy look

Nothing beats a natural wavy look! When done with highlights, this is an easy hairdo that you can achieve within minutes.
Take clip-ins in two shades like dark coffee brown and medium brown. For the best effect, affix clips-in in darker shades towards the bottom of the head. Alternate the colors as you go up so that you get the highlighted effect. 3-4 wefts in two matching shades are enough to achieve a natural wavy look. You can use an iron to curl the lower ends of the hair extensions.
Half up half down

Loved by most women, this hairstyle is a blend of casual and chic, thus, requiring lesser efforts but ensuring an attractive look.
Separate the hair at the nape of your neck and clasp 2-3 wefts to make your hair look thicker. Now, go up and near your ears, and clip 2-3 more wefts. If you want volume on the sides, attach 2 wefts near the temple on both sides.
Hold the front portion of your hair and tie a high ponytail. Secure the ponytail with a band and tighten it for a bouncy effect. Brush your hair and ensure that the clip-ins are not visible. You can straighten or curl up the rest of the hair for a wavy look.
For a glamorous impact, backcomb the ponytail so that it doesn’t fall flat.
Tips for Buying Clip-In Hair Extensions
Remy hair extensions are your first choice
Remy hair is the best choice for hair extensions and wigs, it is the highest quality of hair that helps you achieve the most natural look. Remy clip-in hair extensions are popular because of their in-tact cuticle layer that gives the extensions a natural and tangle-free finish. Do ensure that the hair extensions you buy are made with high-quality, higher-grade Remy hair.
Length guide for choosing hair extensions
You choose the length of clip-in hair extensions according to your requirement, liking, or event. You can also consult with your stylist, or buy the longer clip-in hair extensions, which means you can trim them if you feel they don’t match your hair length. You can use the following picture as a guide when you choose your clip-in hair extensions.

- If you have curly or wavy hair, you need to add 2 - 4 inches to the desired hair.
- If your height is less than 5.2 feet, use the desired hair length to subtract 2 inches for every 0.3 feet.
- For height is between 5.3 - 5.5 feet, you can pick the length of clip in hair extensions based on the above guide picture.
- If your height is 5.6 - 5.9 feet, you need to add 2 inches to your desired hair length when you choose your clip in hair extensions.
- If your height is more than 6 feet, add 2 inches to your desired hair length for every 0.3 feet when you choose your clip-in hair extensions.
The different length options include:
- 14 inch,this adds volume to your hair and is a great choice if you have short hair.
- 16-18 inch,this adds medium length to your hair length.
- 20-22 inch,this is the most popular hair length.
- 24 inch, this is the maximum length of hair, we see this gorgeous length in shampoo commercials.
For people who are experiencing hair loss, you should consult with your doctor first, to determine if wearing hair extensions is suitable for you.
Color guide for choosing clip-in hair extensions
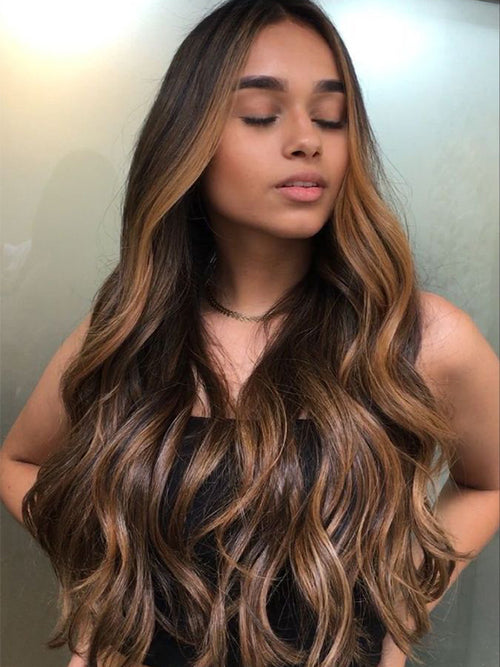
Color variation adds diversity to your hair-line. Clip-in hair extensions are available in various colors from Jet Black to Platinum Blonde, and in numerous styles from Highlights to Balayage. Color adds dimension and depth to your hair, giving it shine and volume.
Choose the color closest to your current hair shade and give your hair the makeover it deserves. The key is to blend the locks as much as you can.
- If in doubt, choose a bit darker shade than your hair rather than a shade lighter, because the crown tends to have darker hair.
- Match the extension clip-ins with the ends of your hair, because they are more visible.
- You can try a two-toned look. Adding extensions that contrast the current shade of your hair to add dimensions and depth.
Tips for Caring Your Clip-in Hair Extensions
Washing the clip-in extensions
Hair extensions also get dirty with use. During summer, the sweat and oil from your scalp will make them clump together. So, you should wash them properly with shampoo as you do with your natural hair. Use normal water to wash the hair, and do not rub it vigorously. Choose shampoos that are devoid of alcohol and sulfate as these two ingredients rob away moisture, leaving the hair dry and more prone to tangling. Using shampoos with argan oil, coconut oil, or castor oil will add moisture to the hair.
However, you have to be careful while shampooing. Overwashing will dry the extensions and damage them. Hairstylists suggest washing once in four to six weeks. However, if you are wearing the hair extensions daily and using styling products regularly, you may have to shampoo the clip-ins more frequently.
Conditioning the clip-in extensions
Like your natural hair, the extensions also require nourishment to remain healthy and gorgeous. Conditioning will help you to retain the glow of the hair extensions and also increase their life span.
Use a regular conditioner after washing your hair. Avoid products that contain alcohol and sulfate. Always check the labels when buying any hair product. Avoid items that contain SLS, Ethanol, Propanol, and Alcohol Denat.
How to dry your hair extensions?
Give the extensions a rinse in cold water at the end to lock in moisture. Squeeze out the excess water and leave them to dry. Never rub them with a towel for drying.
For the hair extensions, using a dryer is not recommended as it would make them dry and eventually lead to breakage. If you are in a hurry and want to use a blow-dryer on your extension clip-ins, first use a heat-protectant spray to enhance their life. To prevent damage, use the dryer on the cool setting and don’t brush them until they are 90% dry.
Also, when blow-drying, start from the root and go down. This will smoothen the cuticles and prevent tangling also.
Styling hair extensions – why should you use a heat protectant?
Women love to try different hairdos with their hair extensions. However, before using any styling product, you have to think about their health. To prevent breakage and shedding, apply a heat protectant before using any styling product. Moreover, setting the product at low heat will also protect the extensions.
Dying your hair extensions – things to remember
Women love to experiment with hair colors. If you want, you can also dye your hair extension in darker shades to try new looks. However, bleaching them is not recommended. Usually, natural hair extensions are dyed when they are processed. Applying bleach on dyed hair is not only difficult but also harmful as the extensions may get damaged. Also, you may not get the desired effect as the hair is already dyed.
How to store your natural hair extensions?
Storing the clip-in extensions properly is vital to maintain their quality and lifespan. Close all the clips after removing them from your scalp. Brush the wefts and ensure that they are dry before storing them away. Keep them in a dry and cool place away from direct sunlight.
Steps of Clipping in your hair extensions
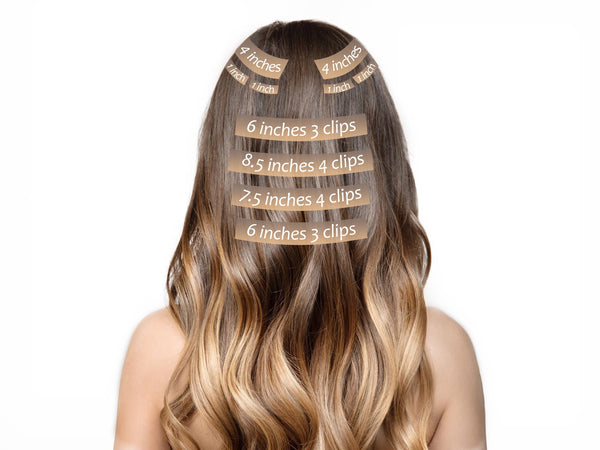
1. Brush your hair
If you want to style your hair neatly, then the first step is to brush your hair. It's essential to start with brushing your hair in the very beginning since it unwinds any tangles in your hair and gives it a neat appearance. Untangling your hair also makes it easier to make different partitions in your hair. Plus, there are many ways that you can use to brush your hair, but we would recommend brushing your hair slowly, so you don't do any damage to them.
2. Clip 6 inches hair weft (3 clips) in
Clipping in your hair extensions is a straightforward and quick process. All you need are a few tools that can be found in every house. They include a wide-tooth comb and a rattail comb, clips, and mirror. The 6-inches hair weft that comes with three clips should be attached to the bottom of your scalp.
You will start by putting the 6-inches weft near the nape of your neck. You need to find a place on your head that will serve as a perfect fit for the 6-inch hair weft. Next, you need to form a horizontal separation in your hair with your fingers and attach the clip.
Now, you have to attach the 6-inch hair weft from its middle within your horizontal hair partition and make sure that it’s clipped extremely close to your hair roots. Once the center clip is attached, you will proceed with the attachment of the left and right clips. You can tease your natural hair to avoid hair extensions sliding down. You could also use some hair products to make sure they stay in place.
3. Clip 7.5 inches hair weft (4 clips) in
Now that you're done attaching the 6-inch hair weft, you can let your tied-up hair down, and you will again start with finding a place with a similar width as your hair weft to ensure its optimal attachment. This place is usually above an inch above the first weft. Now you can clip your hair up once more to attach the 7.5-inch hair weft to your head, and you can also stretch this weft aside to avoid any hindrance while attaching the other clips.
4. Clip 8.5 inches hair weft (4 clips) in
The 8.5 inches weft is the widest, and it needs to be attached to the widest area of your head, and this part is usually just an inch above the second weft.
5. Clip another 6 inches hair weft in
The 6-inch hair weft is also attached after making a horizontal hair partition, and it's attached two inches below the crown of your head. Once you're done attaching the large hair weft, the six small ones will be attached to the sides of your head.
6. Clip the two pieces of 4 inches hair weft (2 clips) in
These wefts are ideal for being placed in the sides of your scalp since they give the appearance of thicker hair in the front of your face that helps in framing an excellent shape for your face. You can make your face look slimmer in a matter of minutes with these extensions. Make a horizontal hair partition two inches above your ear, then clip your remaining hair so they don't come in your way, and attach the hair weft in the horizontal partition. The same process will be repeated for the other side as well.
7. Clip the four pieces of 1.1 inches hair weft (1 clip) in
These 1.1 inches of hair wefts are clipped above the wefts with two clips. Once you are done attaching all the hair wefts, you should take a good look in the mirror to ensure that all the wefts are well-concealed.
Why do many Ladies Choose Clip-in Remy Hair Extensions?

Less Strains on Follicles
Clip-in hair extensions have more than one piece. You can manage the weight of the clip-on hair extension according to your hair volume, and you can remove it at any time. It will not put too much pressure on your hair, which can damage your hair follicles, so do not worry. Clip-in extensions are incredibly soft. They do minor damage to your hair compared to other hair extensions; so, your natural hair grows regularly, and you can make different styles and change according to occasions.
More Flexible than Semi-permanent Extensions Method
Clip-in hair extensions are more flexible and lightweight than permanent extensions, which means you will not even feel them while wearing them; they give you a volume without the head or neck ache. If your hair length is about your shoulder, you will need 12 to 14 inches or 16 to 18 inches extension length to get a super light and natural look. You can make a set depending on your everyday hair needs; if you have lovely hair, you can use a few small wefts that will be fine to fill your hair without being too heavy.
Clip-in Hair Extensions will not be a Trouble When You Want to Use Hair Masks and Treatments on Your Natural Hair.
As clip-in hair extensions are not permanent hair extensions method, you can install them or take them out whenever you want. They offers your hairs a gap, and you can also keep clip-in hair extensions healthy. Most girls are afraid to try different hair colors and masks while wearing clip-in hair extensions; they think it will damage their extensions and natural hairs. But Clip-in hair extension makes it easy for you; you are free to use hair mask ad treatments. You can apply hair masks, different colors, lowlights, or highlights on your natural hairs after takeout clip-ins.
Less Heat Damage to Your Natural Hair
Clip-in hair extensions can save your natural hair from heat styling, and it will be possible when you first make a hairstyle extension and then install it in your hair. You don't need any chemical or heating gadget to install a clip-in hair extension; they have wefts so you can easily install and remove without heat.
Easy to Apply, Friendly to Hair Extensions Beginners

Clip-in hair extensions are temporary and effortless extensions that consist of stainless steel clips with soft silicone sleeves. You can easily apply clip-in hair extensions to your hair than tape-in hair extensions. Clip-ins blend perfectly with your natural hair to make your hair look natural, and you don't need to go to hairstylists or a salon to install clip-ins; you can wear it or remove it at home whenever you want. But the methods of other semi-permanent hair extensions are different; you can't install them in your hair by yourself; you must need a professional for it, and they need maintenance after every six to eight months.
If you are afraid to install clip-ins at home, you can read helpful articles, watch YouTube videos, and practice, and then you will be an expert in clip-ins.
More Affordable than Other Hair Extensions Method

If you don't want to pay endless hours and a lot of money at the hair salon and are fed up with your thin hair and want hair extensions, then go for clip-in hair extensions. They are affordable and easy to use Remy clip-ins; affordable does not mean low quality. They are 100% high-quality and cheap hair extensions that design for every girl. You will cherish how they give you volume and length any time you want without breaking the bank.
Year VS months
Clip-in hair extensions can be worn and remove at any time, and they can be last for a year and their lifespan also depend on how you take care of them, and a tape-in cap can stay on your hairs only for 6 to 8 months, and after removing them, you may not use it again due to its condition. But you can use clip-ins again and again for at least one year.
Easy to maintenance
Clip-in extensions are low-maintenance hair extensions and best for momentary use. They easily install and remove from your hair, and you don't need a hairstylist or beautician. They are made with 100% human hair and don't need high maintenance; you only need to wash and condition them after every 10 to 15 uses.
Popular hair extensions brand on the market
1. Bellami 2. Luxy Hair 3. Mhot Hair 4. Maxfull Hair 5.Glam Seamless 6. Zala